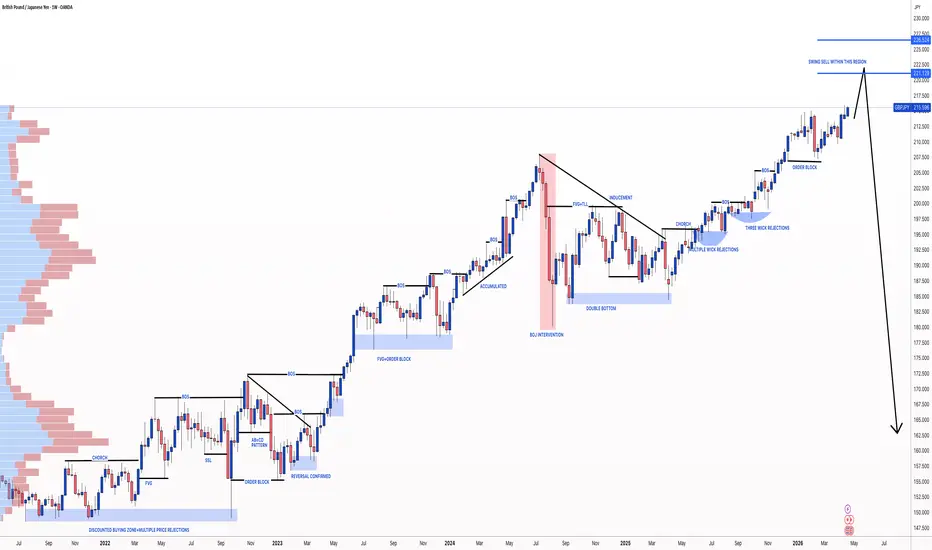
#GBPJPY: Up To +5500 Pips Opportunity In Making! Do Not Miss OutDear traders,
We hope you’re all doing well. We have a fantastic selling opportunity coming up with the GBPJPY pair. We’re approaching the 221 region where most of the volume is expected to surge into the market. As for the JPY, it’s likely to continue its short-term downtrend. The failed ceasefire deal between the USA and Iran is expected to influence investors to increase their positions in the DXY, potentially causing the JPY to plummet even further. The entry area is already established in the market, so keep an eye out for that region. For take profits, we’ll set the first at 200, the second at 190 and the final at 170.
If you agree with this trading idea, please comment and like it. This will boost our confidence to share more analysis.
Team Setupsfx_
Gbpjpyshort
GBPJPY REJECTION ZONE — SELLERS IN FULL CONTROL!📊 Description: OANDA:GBPJPY
GBP/JPY is showing clear rejection from a strong supply (key resistance) zone, marked by multiple failed attempts to break higher. Price is consolidating below this zone, indicating seller dominance and potential distribution phase. As long as price remains under this resistance, the bias stays bearish, with downside targets toward the marked key demand zones and psychological levels below. A clean breakdown from the current structure could accelerate momentum to the downside.
The current structure suggests:
Resistance Zone (Supply): Price is failing to break this area after multiple tests → strong selling interest.
Immediate Support: The first red zone below is acting as short-term support. A clean break here will confirm bearish continuation.
Major Support / Demand: The lower key zone + psychological level will be the next target if momentum builds.
As long as price stays below resistance, the market favors:
➡️ Lower highs + bearish continuation
➡️ Break of support = acceleration move downward
➡️ Possible liquidity sweep before drop (fake push up)
Watch for confirmation:
✔️ Bearish engulfing from resistance
✔️ Break & retest of support
✔️ Weak bullish momentum
⚠️ Disclaimer:
This analysis is for educational purposes only and not financial advice. Always manage your risk properly and confirm setups with your own strategy before trading.

USDCAD | GBPJPY | AUDUSD COMBINED +11% TRADING DAY📈Q2 | W17| D23 | Y26 |
📊USDCAD | GBPJPY | AUDUSD COMBINED +11% TRADING DAY
💡USDCAD OVERNIGHT HOLD CLOSED AT DXY DAILY 50 EMA + 3.27%
💡GBPJPY +2 %
💡AUDUSD + 6%
🔍 Analysis Framework
This forecast is built using an advanced adaptation of Smart Money Concepts, with a structured and disciplined approach:
• Marking Key Points of Interest (POIs) on Higher Time Frames (HTFs) 🕰️
• Defining a clear, controlled trading range from those zones 📐
• Refining entries on Lower Time Frames (LTFs) 🔎
• Waiting for confirmed Break of Structure (BoS) before execution ✅
This process ensures precision, removes emotional decision-making, and keeps me aligned with the overall market narrative.
💡 Core Philosophy
“Capital management, discipline, and consistency create longevity.”
A strong risk-to-reward model, paired with high-probability execution, is the foundation of sustainable trading 📈🔐
⚠️ Understanding Losses
"Losses are part of the game" — a mathematical certainty 🎲
They don’t define performance. Nor do they define you as a Trader.
They are managed, reviewed, and used as evidence for growth 📊
🙏 Final Note
Appreciate you taking the time to review today’s forecast.
Stay disciplined 🎯
Protect your capital 🔐
— FRGNT 🚀📈
📌 Disclaimer
This content is provided for educational purposes only and does not constitute financial advice.
It reflects my personal approach to the markets — a tested framework that has supported my own journey toward consistent profitability in currency trading.
Please understand that any forecasts shared are not financial advice. I will be looking for confirmation in line with my setup model and specific entry criteria from the key areas identified on the chart.
All analysis, whether presented via image or video, is shared strictly for educational insight and is not intended to breach any TradingView House Rules.

GBPJPY| FRGNT DAILY CHART ANALYSIS | GBPJPY A NEW ADDITION📈Q2 | W17| D23| Y26 |
📊GBPJPY| FRGNT DAILY CHART ANALYSIS | GBPJPY A NEW ADDITION
💡CURRENTLY SHORT | FORECASTING FURTHER SHORTS INLINE WITH DXY STRENGTH & GBP WEAKNESS
🔍 Analysis Framework
This forecast is built using an advanced adaptation of Smart Money Concepts, with a structured and disciplined approach:
• Marking Key Points of Interest (POIs) on Higher Time Frames (HTFs) 🕰️
• Defining a clear, controlled trading range from those zones 📐
• Refining entries on Lower Time Frames (LTFs) 🔎
• Waiting for confirmed Break of Structure (BoS) before execution ✅
This process ensures precision, removes emotional decision-making, and keeps me aligned with the overall market narrative.
💡 Core Philosophy
“Capital management, discipline, and consistency create longevity.”
A strong risk-to-reward model, paired with high-probability execution, is the foundation of sustainable trading 📈🔐
⚠️ Understanding Losses
"Losses are part of the game" — a mathematical certainty 🎲
They don’t define performance. Nor do they define you as a Trader.
They are managed, reviewed, and used as evidence for growth 📊
🙏 Final Note
Appreciate you taking the time to review today’s forecast.
Stay disciplined 🎯
Protect your capital 🔐
— FRGNT 🚀📈
📌 Disclaimer
This content is provided for educational purposes only and does not constitute financial advice.
It reflects my personal approach to the markets — a tested framework that has supported my own journey toward consistent profitability in currency trading.
Please understand that any forecasts shared are not financial advice. I will be looking for confirmation in line with my setup model and specific entry criteria from the key areas identified on the chart.
All analysis, whether presented via image or video, is shared strictly for educational insight and is not intended to breach any TradingView House Rules.
FX:GBPJPY

GBPJPYGBPJPY
- Completed " 1234 " Impulsive Waves
- Order Block
- Bullish Channel as an corrective pattern in Short Time Frame
- RSI - Divergence
- Fair Value Gap

GBPJPY Bullish Structure Holds With Strong Trend ContinuationI’m looking at GBPJPY and this is one of those charts where you don’t want to overcomplicate things. The move up was clean, aggressive, and structurally sound. What we’re seeing now isn’t weakness, it’s digestion. Price pulled back into a defined demand zone and immediately found buyers again. That’s not random, that’s trend behavior. As long as this structure holds, the upside isn’t done yet.
Current Bias:
Bullish (4H timeframe focus)
The overall structure remains bullish. The recent pullback is corrective, not a reversal, and price is holding above key demand.
Technical Posture & Price Action:
Strong impulsive rally forming a clear uptrend (higher highs and higher lows)
Recent pullback into demand zone (~214.00 area)
Immediate reaction from that zone → bullish response
Current price attempting to re-establish momentum
What stands out:
Pullback respected structure perfectly
No break of higher low
Buyers stepped in early
👉 This is classic continuation setup, not distribution
Indicator & Volume Analysis:
Momentum cooled slightly after the rally (normal behavior)
No structural bearish divergence visible
Recent bullish reaction suggests momentum is re-engaging
Volume perspective:
Rally phase likely supported by strong participation
Pullback phase shows reduced selling pressure
👉 That combination typically leads to continuation
Key Fundamental Drivers:
GBP holding relatively strong vs low-yield currencies
JPY weakness remains a dominant theme (carry trade flows)
Interest rate differential continues to favor GBP
So fundamentally:
👉 Yield + carry trade demand = bullish pressure
Macro Context:
BOJ still relatively accommodative → weak JPY
UK yields remain elevated compared to Japan
Risk sentiment stable enough to sustain carry trades
Also:
No major shift in BOJ policy expectations yet
Markets still favor higher-yield currencies
👉 Macro supports continuation higher
Primary Risk to the Trend:
Bullish setup fails if:
Price breaks below 213.80–214.00 demand zone
BOJ signals tightening or intervention
Risk sentiment collapses (carry trade unwind)
That would shift flows back into JPY strength.
Most Critical Upcoming News/Event:
BOJ commentary or intervention signals
UK economic data (inflation, growth)
Global risk sentiment shifts
Leader/Lagger Dynamics:
GBPJPY is a leader in carry trade flows.
It reflects:
Risk appetite
Yield differentials
Market willingness to hold risk
It often influences:
👉 AUDJPY, NZDJPY direction
Key Levels:
Support Levels:
214.00
213.20
Resistance Levels:
215.90
217.00
Stop Loss (SL) & Invalidation Point:
Below 213.80
Take Profit (TP) Targets:
TP1: 215.90
TP2: 217.00
Summary: Bias and Watchpoints:
I’m bullish on GBPJPY, and the structure makes that view straightforward. The trend is intact, the pullback respected demand, and buyers stepped in exactly where they needed to. That’s not coincidence, that’s controlled market behavior.
As long as price holds above 213.80–214.00, I’m expecting continuation toward 215.90 and potentially 217.00. The bigger picture here is still driven by carry trade dynamics, with GBP benefiting from yield advantage while JPY remains structurally weak.
This is not the time to chase — it’s a continuation setup that rewards patience. If the demand zone keeps holding, the next push higher is likely already building.

GBPJPY H1 | Bearish Reaction Off Pullback ResistanceMomentum: Bearish
Price is currently below the ichimoku cloud.
Sell entry: 215.177
- Pullback resistance
- 71% Fib retracement
Stop Loss: 215.725
- Swing high resistance
Take Profit: 214.411
- Swing low support
High Risk Investment Warning
Stratos Markets Limited (fxcm.com/uk), Stratos Europe Ltd (fxcm.com/eu):
CFDs are complex instruments and come with a high risk of losing money rapidly due to leverage. 69% of retail investor accounts lose money when trading CFDs with this provider. You should consider whether you understand how CFDs work and whether you can afford to take the high risk of losing your money.
Stratos Global LLC (fxcm.com/en): Losses can exceed deposits.
Please be advised that the information presented on TradingView is provided to FXCM (‘Company’, ‘we’) by a third-party provider (‘TFA Global Pte Ltd’). Please be reminded that you are solely responsible for the trading decisions on your account. Any information and/or content is intended entirely for research, educational and informational purposes only and does not constitute investment or consultation advice or investment strategy. The information is not tailored to the investment needs of any specific person and therefore does not involve a consideration of any of the investment objectives, financial situation or needs of any viewer that may receive it. Past performance is not a reliable indicator of future results. Actual results may differ materially from those anticipated in forward-looking or past performance statements. We assume no liability as to the accuracy or completeness of any of the information and/or content provided herein and the Company cannot be held responsible for any omission, mistake nor for any loss or damage including without limitation to any loss of profit which may arise from reliance on any information supplied by TFA Global Pte Ltd.
Stratos Trading Pty. Limited (fxcm.com/au):
Trading FX/CFDs carries significant risks. FXCM AU (AFSL 309763), please read the Financial Services Guide, Product Disclosure Statement, Target Market Determination and Terms of Business at fxcm.com/au

SHORT GBPJPYThis is a short term drop to the perfect equal lows and breakaway at the final draw
We have a unicorn setup breaker FVG
Price has cleared monthly buystops with a double purge (M15 OUTLOOK)
We are at premium prices

GBPJPYGBPJPY
- Bullish Channel as an corrective pattern in Short Time Frame
- Fibonacci Level - 361.80%
- Completed " 123 " Impulsive Waves
- Order Block
- Demand Zone

GBPJPY Update | Bearish Structure Still in FocusGBPJPY Update:
The daily chart has already made a new lower low, supporting the idea that this could be a weekly lower high in progress. Price is now pushing upward, and I am watching this move carefully for a potential daily lower high. If sellers defend this area, bearish continuation could follow.

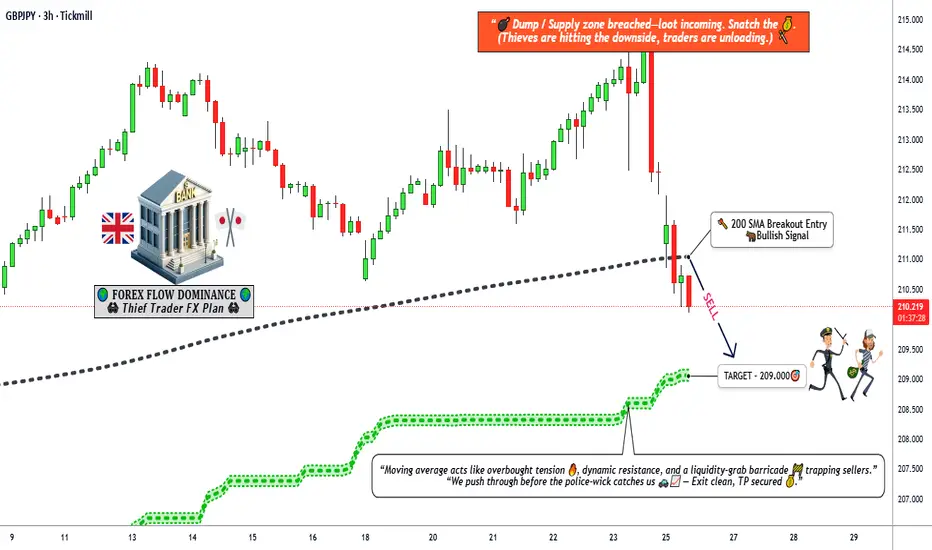
Has GBP/JPY Topped After Moving Average Rejection?🎯 GBP/JPY "THE GUPPY" BEARISH SWING/DAY TRADE SETUP | Multi-Layer Entry Strategy 🔥
📊 MARKET OVERVIEW
Asset: GBP/JPY (The Guppy) - Forex Major Cross
Trade Type: Swing/Day Trade
Direction: 🐻 BEARISH BIAS CONFIRMED
Strategy: Thief Layering Method (Multiple Limit Orders)
🎯 TRADE PLAN BREAKDOWN
📉 BEARISH SETUP CONFIRMED:
✅ Simple Moving Average (SMA) Breakout Detected
✅ Price Rejection at Key Resistance Zone
✅ Overbought Conditions on Multiple Timeframes
✅ Moving Average Acting as "Police Force" Resistance
🚨 ENTRY STRATEGY: THIEF LAYERING METHOD
⚠️ IMPORTANT: This strategy uses MULTIPLE SELL LIMIT ORDERS (Layering Technique)
🎯 Suggested Sell Limit Layers:
Layer 1: 211.500 🔴
Layer 2: 211.000 🔴
Layer 3: 210.500 🔴
💡 PRO TIP: You can add more layers or adjust based on your risk tolerance and account size. This "ladder entry" approach helps average your entry price and reduces timing risk.
Alternative: Market execution at current price levels is also viable if price shows immediate bearish momentum.
🎯 TAKE PROFIT TARGET
Primary TP: 209.000 💰
⚠️ THIEF OG's DISCLAIMER:
This is a suggested target zone. You are your own boss! Take profits when YOU feel comfortable. Scale out partially at psychological levels (210.00, 209.50) if you prefer to lock in gains progressively. Your money, your rules, your risk!
🛑 STOP LOSS
Thief SL: 212.000 ⛔
⚠️ RISK MANAGEMENT NOTICE:
This is a recommended invalidation level. Adjust based on your personal risk tolerance and position sizing. Never risk more than 1-2% of your account per trade. Ladies & Gentlemen, protect your capital first—profits come second!
📈 CORRELATED PAIRS TO WATCH
Direct Correlation Analysis:
GBP/USD (Cable) 🇬🇧💵
Watch for: GBP weakness will amplify bearish move on GBP/JPY
Key Level: Monitor 1.2400 support zone
EUR/JPY 🇪🇺🇯🇵
Correlation: High positive correlation (~0.85)
Use Case: Confirms JPY strength across the board
USD/JPY 🇺🇸🇯🇵
Watch for: JPY strength against USD = stronger confirmation
Key Level: Breaking below 155.00 = JPY bullish momentum
GBP/CHF 🇬🇧🇨🇭
Correlation: Measures pure GBP strength
Use Case: Weakness here confirms GBP leg of our bearish thesis
XAU/USD (Gold) 🥇💵
Risk-Off Indicator: Rising gold = JPY strength (safe haven flow)
Current Zone: Watch $2,750-2,800 resistance
🌍 FUNDAMENTAL & ECONOMIC FACTORS
🇬🇧 GBP FUNDAMENTALS (Bearish Pressure):
Bank of England (BoE): Dovish stance expected; potential rate pause/cut cycle ahead
UK GDP Growth: Slowing economic momentum concerns
Inflation Data: Cooling CPI reduces hawkish BoE expectations
Political Uncertainty: Fiscal policy concerns weighing on Sterling
🇯🇵 JPY FUNDAMENTALS (Bullish Support):
Bank of Japan (BoJ): Shifting away from ultra-loose policy; normalization talks
Yen Strength Drivers: Safe-haven demand amid global uncertainty
Wage Growth: Rising wages supporting domestic inflation = hawkish BoJ pivot potential
Intervention Risk: Japanese authorities monitoring excessive Yen weakness
📅 UPCOMING NEWS CATALYSTS TO WATCH
⚠️ HIGH-IMPACT EVENTS THIS WEEK:
🇬🇧 UK Economic Data:
Manufacturing & Services PMI
Retail Sales Data
BoE Speakers/Minutes
🇯🇵 Japan Economic Data:
Tokyo CPI (leading inflation indicator)
BoJ Policy Meeting Minutes
Trade Balance Data
🌐 Global Risk Sentiment:
US Federal Reserve Statements
Global Equity Market Performance (Risk-On/Risk-Off flows)
Geopolitical Tensions (affects safe-haven demand)
💡 TRADING NOTE: Avoid holding through major BoE or BoJ announcements if day trading. For swing traders, widen stops during high-volatility events.
🔥 TECHNICAL CONFLUENCE CHECKLIST
✅ SMA Breakout (Bearish)
✅ Resistance Rejection at 211.50+ zone
✅ Overbought RSI/Stochastic on H4/Daily
✅ Price Trapped Above Key Support-Turned-Resistance
✅ Momentum Divergence Signals
✅ Volume Confirmation on Reversal Candles
💎 THIEF TRADING PSYCHOLOGY REMINDERS
🧠 Stay Disciplined: Stick to your plan, not your emotions
💰 Manage Risk First: Profits are a byproduct of good risk management
📊 Follow Price Action: Let the market tell you when you're right or wrong
🎯 No FOMO: Missing a trade is better than forcing a bad one
🚀 Scale Your Winners: Let profitable positions breathe with trailing stops
🏆 FINAL VERDICT
The GBP/JPY "Guppy" is showing HIGH-PROBABILITY bearish setup with technical, fundamental, and correlation alignment. The Thief Layering strategy allows flexible entry management while the 209.000 target offers solid risk:reward potential.
Risk:Reward Ratio: Approximately 1:2.5 (based on layer average entry)
👍 If this analysis helps you, smash that LIKE button and FOLLOW for more Thief Strategy setups!
💬 Drop your thoughts below—are you team BEAR or waiting for confirmation?
#GBPJPY #ForexTrading #ThiefStrategy #TechnicalAnalysis #SwingTrading #DayTrading #ForexSignals #PriceAction #RiskManagement #TradingView #ForexCommunity #TheGuppy 🎯📊💰
#GBPJPY: Latest Update Intraday Selling Trading Setup! ✴️ The GBPJPY pair recently established a record high at 214 before experiencing a decline to 208. Subsequently, robust support emerged, initiating a price reversal. The current trading price stands at 212.43, where significant resistance is evident. We are observing substantial selling volume entering the market; however, strong fundamental support is required, particularly for the Japanese Yen, given its recent record low.
✴️ This situation presents challenges in accurately determining price action for JPY pairs. Further analysis suggests potential intervention by the Bank of Japan in the near future, which would align with our assessment.
✴️We have identified two potential selling opportunities: the initial entry point is at the current trading price upon market open on Monday, and the secondary entry point is at 213.90, should the market clear buy-side liquidity. Please utilize the entry strategy that best aligns with your analytical perspective.
Like And Comment
Team Setupsfx_
#gbpjpy #gbpjpysell #gbp #jpy #smartmoneyconcept #smc #ict
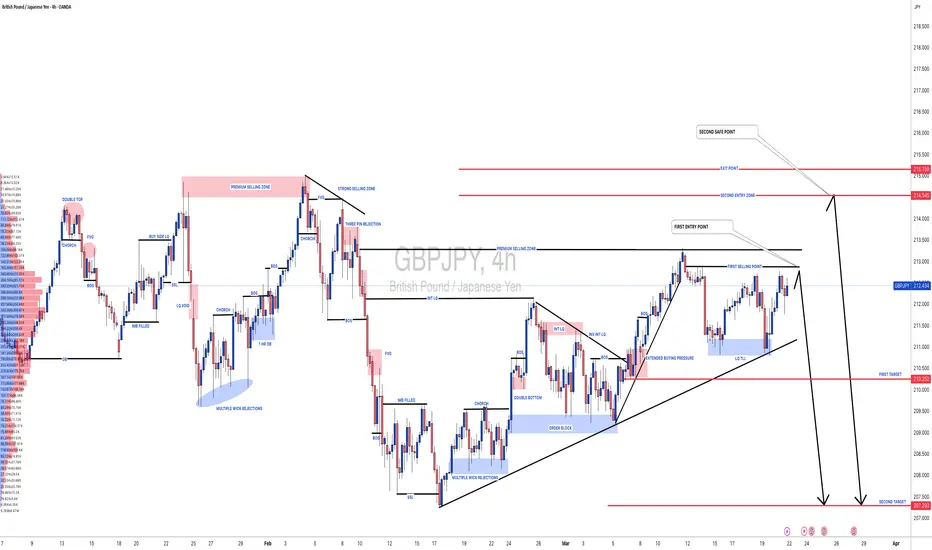
Market Overview (GBPJPY - 4H)Market has formed a rising structure (trendline support) but is now approaching strong higher timeframe supply
Price tapped into a 4H Order Block (OB) near the highs
Multiple rejections in this zone suggest weak bullish momentum
Potential for a distribution phase → bearish move
🔴 Key Zones
4H Supply / OB (Sell Zone): ~213.000 – 213.500
Internal Resistance: ~211.500 – 212.000
Trendline Support: Rising from ~207 area
Current Price: ~212.700
📉 Short Idea (Educational Setup)
🧠 Concept:
Price reacts from HTF supply → fails to continue higher → breaks structure → moves lower
🎯 Possible Plan:
Entry Zone: 213.000 – 213.400 (4H OB area)
Stop Loss: Above 213.800 – 214.000 (above OB)
Targets:
TP1: 211.500 (internal support)
TP2: 210.500 (trendline area)
TP3: 208.500 (lower liquidity zone)
⚠️ Invalidation / Risk
If price breaks and holds above 4H OB, bearish idea is invalid
Strong bullish breakout may push toward 214.500+
Avoid early entries — wait for rejection or structure shift
💡 Alternative Scenario
👉 If trendline holds and OB breaks:
Market may continue bullish
Possible targets: 214.500 – 215.500
🔥 Simple Summary
👉 Price at strong resistance (4H OB)
👉 Weak continuation → possible rejection
👉 Looking for confirmation → then short continuation

GBPJPY H1 | Bearish Reaction Off Pullback ResistanceMomentum: Bearish
Price is currently below the ichimoku cloud.
Sell entry: 211.684
- Pullback resistance
- 61.8% Fib retracement
- Fair value gap
Stop Loss: 212.123
- Swing high resistance
Take Profit: 210.956
- Swing low support
High Risk Investment Warning
Stratos Markets Limited (fxcm.com/uk), Stratos Europe Ltd (fxcm.com/eu):
CFDs are complex instruments and come with a high risk of losing money rapidly due to leverage. 69% of retail investor accounts lose money when trading CFDs with this provider. You should consider whether you understand how CFDs work and whether you can afford to take the high risk of losing your money.
Stratos Global LLC (fxcm.com/en): Losses can exceed deposits.
Please be advised that the information presented on TradingView is provided to FXCM (‘Company’, ‘we’) by a third-party provider (‘TFA Global Pte Ltd’). Please be reminded that you are solely responsible for the trading decisions on your account. Any information and/or content is intended entirely for research, educational and informational purposes only and does not constitute investment or consultation advice or investment strategy. The information is not tailored to the investment needs of any specific person and therefore does not involve a consideration of any of the investment objectives, financial situation or needs of any viewer that may receive it. Past performance is not a reliable indicator of future results. Actual results may differ materially from those anticipated in forward-looking or past performance statements. We assume no liability as to the accuracy or completeness of any of the information and/or content provided herein and the Company cannot be held responsible for any omission, mistake nor for any loss or damage including without limitation to any loss of profit which may arise from reliance on any information supplied by TFA Global Pte Ltd.
Stratos Trading Pty. Limited (fxcm.com/au):
Trading FX/CFDs carries significant risks. FXCM AU (AFSL 309763), please read the Financial Services Guide, Product Disclosure Statement, Target Market Determination and Terms of Business at fxcm.com/au

GBPJPY 15M Short1- JPY index bearish.
2- GBP JPY on 4H TF playing in range and currently in lower zone.
3- 1H alligator wide open point downards
4- FVG bearish gap on 1Hr filled
5- Trade setup on 15M Short with RR=1:1

GBPJPYGBPJPY
- Order Block
- Completed " 12345 " Impulsive Waves and " AB " Corrective Waves
- Sell Side Liquidity
- Rising Wedge as an corrective pattern in Short Time Frame
- Fibonacci Level - 78.60%

Not a big fan of GJ but the Origin of Displacement never lies.• Structure is bullish on the daily and weekly tf, this setup is a retracement
• Buyers shifted control to sellers (short-term) from that Displacement
• The inefficiency left behind in the form of an Imbalance needs to be filled
• Institutional sell intent confirmed
• The orders that failed to fill has now become our poi as supply.
• Our POI in H4 is an indecision candle depending on your broker on MT5 so our limit orders should be placed at the body candle open.
• Stop Loss: 30 pips
• RR - 1:12 but once price has done 1:4, kindly take partials or close some.
• Manage risk...you are always in charge of the outcome of any trade, never forget that.

GBP/JPY Price Outlook – Trade Setup📊 Technical Structure
OANDA:GBPJPY On the 60-minute (60M) chart dated March 17, 2026, GBP/JPY is exhibiting a corrective bounce, ticking higher to trade near the 212.00 psychological level. The pair has established a clear Resistance Zone between 212.00 – 212.28, which is currently being reinforced by a significant descending trendline acting as a technical ceiling.
On the downside, a firm horizontal Support Zone is identified between 210.66 – 210.96. The current price action shows a "rejection from the top" sentiment as the pair struggles to find acceptance above the trendline resistance, suggesting that the broader bearish bias remains intact ahead of major central bank decisions.
Short-term bias: Bearish while below 212.28.
Key Resistance: 212.00 – 212.28.
Key Support: 210.66 – 210.96.
🎯 Trade Setup (Sell-the-Rally Scenario)
Entry Zone: 212.00 – 212.28 (Selling near the descending trendline and resistance zone).
Stop Loss: 212.34 (Placed strictly above the recent swing high and resistance cluster).
Take Profit 1: 210.96
Take Profit 2: 210.66
Risk–Reward Ratio: Approx. 1:3.05.
📌 Invalidation: A decisive hourly candle close above 212.34 would invalidate the bearish setup, signaling a breakout from the descending structure and a potential move toward 213.00.
🌐 Macro Background
The GBP/JPY pair is currently being driven by a combination of JPY underperformance and anticipation of high-impact monetary policy events:
BoJ Policy Stance: Governor Kazuo Ueda remains confident in moderate price and wage growth, with underlying inflation gradually accelerating toward the 2% target. The Bank of Japan (BoJ) is widely expected to hold interest rates steady at 0.75% this Thursday.
BoE Expectations: The Bank of England (BoE) is also projected to leave interest rates unchanged at 3.75% on Thursday. Surging oil prices due to Middle East supply disruptions have de-anchored global inflation expectations, prompting a cautious approach from policymakers.
UK Labor Market: Investors are awaiting UK labor market data for January, with the unemployment rate expected to hold steady at 5.2% while wage growth is projected to cool slightly to 4%.
🔑 Key Technical Levels
Resistance Zone: 212.00 – 212.28.
Support Zone: 210.66 – 210.96.
📌 Trade Summary
GBP/JPY is testing a critical technical ceiling defined by horizontal resistance and a descending trendline. While the JPY remains weak, the lack of follow-through buying above 212.00 favors bearish traders ahead of the BoJ and BoE meetings.
Preferred strategy: Seek short opportunities on minor intraday rallies toward the 212.00 area, targeting the 210.96 support floor.
⚠️ Disclaimer
This analysis is for reference only and does not constitute trading advice. Financial markets involve significant risk; proper risk and position management are essential.

GBPJPY LONGWe anticipate that the pair grab sell side liquidity and mutigate the bullish order block in retracement.

A big crash in GBP/JPYLong-term view, but starting from now!!!!
Due to the rising tensions in the Middle East, I expect a potential drop in this currency pair

TheGrove | GBPJPY SELL | Idea Trading AnalysisGBPJPY is moving on Resistance area and is testing the upper boundary of an ascending channel and showing signs of rejection, we may see a corrective move towards lower support zones.
We expect a decline in the channel after testing the current level.
We expect a decline in the channel after testing the current level
Hello Traders, here is the full analysis.
I think we can soon see more fall from this range! GOOD LUCK! Great SELL opportunity GBPJPY
I still did my best and this is the most likely count for me at the moment.
-------------------
Traders, if you liked this idea or if you have your own opinion about it, write in the comments. I will be glad ⚜️

GBPJPY shortThe pair is correcting imbalances and cradling towards the Order block. The liquidity is almost grabbed. Pending orders can be placed.

GBP/JPY – Symmetrical Triangle Breakdown Setup (1H)On the 1H timeframe, GBP/JPY is compressing inside a clear symmetrical triangle pattern. Price has been respecting both descending resistance and ascending support — forming lower highs and higher lows.
Now, momentum is weakening near the apex of the structure.
A breakdown below the ascending trendline could trigger a strong bearish expansion toward the marked lower key demand zones.
🔎 Technical Overview:
✅Clear triangle compression
✅Lower high formation inside structure
✅Bearish momentum building
✅Liquidity resting below recent lows
✅If sellers gain control and we see a confirmed breakdown with strong candle closes, the downside move could accelerate quickly toward the first key support zone.
✅Failure to break down and a strong bullish breakout above descending resistance would invalidate the bearish scenario. OANDA:GBPJPY
🎯 Bearish Roadmap
1️⃣ Breakdown confirmation below triangle support
2️⃣ First target: Near-term key demand zone
3️⃣ Extended target: Lower liquidity zone marked on chart
Patience is key — wait for confirmation before execution.
✅ Support this analysis with a
LIKE 👍 | COMMENT 💬 | FOLLOW 🔔
It helps a lot & keeps the ideas coming!
⚠️ Disclaimer: This analysis is for educational purposes only.
